Team Proposal & Research Document
Team Name: Spooks Ahoy
Introduction to Project
Environment backstory
Our environment is set to be a doll’s house that belonged to the child that used to live in an identical house. One day, the real home burned (along with the doll’s house) after a kitchen fire, resulting in the souls of the house remaining there to this day.
Style & Aesthetics/ reasons behind choice of style
We are planning to make a stylised house. As we are making a doll’s house, this means that some materials to make certain objects may not be what is expected for real life; for example, in some of the mood boards below, the armrests for the chairs are made from cardboard as opposed to wood.
References to existing content Film/TV/ Games etc.
‘Little Nightmares’ is where the idea for our environment to be a doll’s house originated from. In this game, the environment comes across as similar to doll’s house, but the proportions are altered to further the uncanny valley effect
Potential Problems and possible solutions
- Creative differences. To resolve this, we will need to listen to each other and reach a compromise
- Members of the team not completing the work on time – to try and avoid this situation in the first place, we will update our Trello page regularly to show other members of the team whereabouts we are with our work (as well as communicating). If one member feels as though they are not going to be able to complete a certain area in time one week, they will need to communicate this to the other members as early as possible. If a member is continuously not completing the tasks they are set, we will contact tutors where necessary
Skill base within the team
- Emily – Organisation/ Art
- Alex – Modelling
- Will – Photoshop
Resources you will need to access in order to achieve given style
- Photoshop
- Mudbox
- Textures.com
- HDRI Haven
- Substance Painter (?)
Sounds Diegetic AND Non-Diegetic
- Child laughing (Non-diegetic)
- Fire (Diegetic)
Each member of our team made our own moodboards to generate ideas for the style, lighting and props in our environment. Below are the moodboards I made:
Style Moodboard

Lighting Moodboard

Props Moodboard

Team Contract
Team Members & Roles:
- Emily Hodgson – Style moodboard, Living room, (hallway)
- Alex Gillatt – Lighting moodboard, kitchen, (hallway)
- Will Fairhurst – Real world props moodboard, dining room (hallway)
These are the terms of group conduct and cooperation that we agree on as a team.
Participation and attendance: We agree to complete the tasks set between ourselves to the best of our abilities within the timeframe we set ourselves.
Participate as outlined in our project proposal. If one team member fails to attend on two successive sessions without prior notice lecturers will be informed immediately.
Communication: We agree to inform other members of our group in advance if we do not feel as though we are going to be able to complete one of our individual tasks within the given timeframe.
Update the Trello page (tick our sections as complete once we have completed them), messenger calls etc.
Meetings: We agree to meet once every Monday to discuss our progress with the project and show our progress.
We agree to hold weekly team meetings chaired on a carousel basis.
Conflict: We agree to resolve any conflict that arises in a professional manner. If team members don’t abide by the contract/ workload they are given we will contact tutors if necessary.
Deadlines: We agree to work efficiently as a group towards the deadlines we set amongst ourselves
Team Communication this week:
- Messenger call where we discussed our team contract etc.

- Trello Updates – upon completing our moodboards, we ticked it off under our individual checklists on Trello and uploaded the moodboard to our Trello page for other members of the group to see so we all have a clear understanding of our view for the project.


LINK TO TRELLO PAGE: https://trello.com/invite/b/CE9Oq0si/1d624b38c8a4e8379e106864131b6601/haunted-house-project
In addition to our Trello Page, we also created a shared Google Drive whereby we can upload our work to, which will enable us to easily share our work with each other, as well as acting as a backup if we lose any files.


Monday 25th – Sunday 1st November
This week I focused on blocking out the living room and the assets I am going to be creating for the hallway, to ensure that the assets I make are to scale.
SCRUM Notes (25th November)
All members present. Ensured that everyone was on the same page regarding the style of our project (1900s house). We then thought of potential assets for our rooms and split them into low to high priority. This week, we have agreed to make blockouts of our rooms to understand the scale for each of our assets.

LINK TO TEAMWEEK SCHEDULE:
https://app.teamweek.com/#pg/azMQatQyFgF15xxMGaOa0LVr6lp2JdoA
We also used this meeting to update our Trello page, creating checklists for the assets we plan to make for our rooms and then breaking this down into high, mid and low priority assets.

For the living room assets, I have marked the piano and stool, fireplace/ fireguard, curtain and doors as high priority assets. I have marked these as high priority assets because the piano is a big asset which fills most of the room, so it will need to be one of the most detailed assets in my scene. I have also marked the fireplace and curtains as high priority as I believe these assets will help highlight that the room is the living room.
I have marked the clock and skirting board as low priority assets because they are some of the smallest assets in my scene and I believe the room would still look like a living room without them.

As all members of my group are contributing to the hallway, this means I don’t have as many assets to create as I do for the living room. In the above screenshot I have completed the blockout phase for what I am
When it came to blocking out our rooms, we made the decision to change our plans slightly; initially we had planned on modelling a doll’s house but after modelling the side of the cardboard settee, I proposed that we model the actual house the doll’s house is supposed to be mirroring, as I felt we would model better assets if basing them on the real thing rather than cardboard versions. This meant instead of making a stylised house as we stated in the proposal, we are now aiming for a realistic style for our project.


My living room blockout is mainly basic geometry. I made the curtain for the scene quickly by:
- Creating a plane and selecting the FX menu
- (With the plane selected) nCloth > Create nCloth
- Scale a cube above the plane and select the vertices on the top row of the plane and select the cube. nConstraints > Point to surface (his stopped the plane from falling on playback)
- ‘Fields/ Solvers’ > Interactive Playback.
- I then scaled the cube during playback, allowing me to make wrinkles in the curtain.

For the hallway my focus will be on the stairs. The important thing to get right in this blockout was the scale for the balcony.
Monday 2nd – Sunday 8th
SCRUM notes 2nd December:
All members present. This week we shared our blockouts with each other. We have agreed to start working on the first asset for our rooms and aim to have this modelled, UVd and textured as soon as possible (early next week) so that we can see each other’s first asset and ensure they all abide to the same style. Considered adding emissive maps to make it look like the fire was recent. I brought up the idea of adding a carving with two initials and a heart to the piano which could further the story to the house – there could have been a problem in the relationship which resulted in the fire being caused on purpose.
After this SCRUM meeting, I updated my Trello tasks, adding the piano asset and a checklist for the model, UVs and textures with a due date of the 11th.

I have also updated my schedule on the Teamweek page to match the plan discussed in the SCRUM meeting – I have extended the time spent on modelling to carry on into the Christmas holidays, with the texturing phase overlapping. This is because for this project, I am going to complete asset (including texturing) as I go, rather than doing the UVs for the room all at once for example.

To begin my piano asset, I made a moodboard for the piano so I had a clear image of what I was trying to make:

I opened a new Maya scene and set the project to the Haunted house project I had previously made so my saves for the piano would still be in the same folder. Next, in each of my orthographic views I added my reference images for the piano. I then imported my piano blockout to use as scale reference and ensured the reference images were scaled to the same size as the piano blockout.

With my reference images scaled, I then deleted the piano blockout and started to model the final asset.


- Bezier curve
- Scaled a cube at the end of it and extruded
- Channel box, Scrolled down under the extrude subheading to find divisions. Increased to 50 so it had the shape of the curve
- Retopologised the mesh (polyRetopo;)
- Added edge loops around the edges
- Crooked move tool fixed by double clicking the move tool and resetting the tool
- Selected top faces, duplicated them and extracted them. Hid the rest of the piano. Went into top view and used thee append to polygon tool so fill the gap between the sides
- Duplicated the filled in faces and moved to bottom
- Duplicated bottom, moved slightly above and moved the vertices back
- Used a difference Boolean to make the holes
- Selected the edges of the holes, extruded and adjusted accordingly
I found this tutorial useful to use alongside my reference images despite the fact it uses ‘Blender’ instead of Maya.
Monday 9th – Sunday 15th
SCRUM Notes (9th December)
All members present. Discussed our progress with the asset we set to have completed by the 11th.
- Emily – Model completed, UVs close to completion. On track to have asset completed for the 11th. Hoping to have the piano stool and fireplace completed by the end of next week (22nd).
- Alex – Models completed, UVs close to completion. May need time to extension. Creating two cabinets after completing pots and pans. Aiming to have this all completed by the end of next week (22nd)
- Will – Model completed, UVs close to completion. May need time extension. Will be creating 6 chair assets after completing table. Aiming to have them completed by the end of next week (22nd)

Schedule Update
This week I updated the initial schedule I had set myself. I was initially going to use the template schedule we were given, but after considering the way I like to work (texturing assets as I make them), I decided to update the schedule I am following.
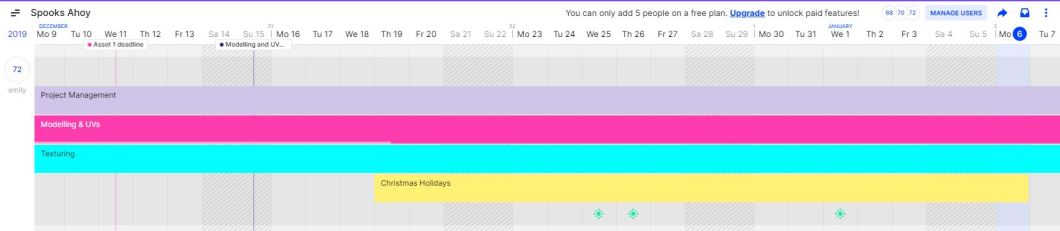
The main change here is that I am modelling and texturing throughout the course of the project, as opposed to focusing on completing all the models first then doing all the UVs at once etc.
With this schedule, I aim to complete all my assets by the 12th January.
Progress
Completed piano UVs (10th December). Here, I have decided to look into and use UDIMs for the grand piano, as trying to fit all of the UVs into one tile made for a very low texel density.
11th December – added comments under the piano asset task of the team Trello page and extended the deadline on it from the 11th to the 14th. This was a result of the UVing stage for the piano taking longer than expected and I want to give myself enough time to not only watch the tutorials on using Substance Painter, but also not rush the texturing in a day. As I have stated in my Trello comments, as the piano is my highest priority asset, I don’t mind spending a bit longer on it but do not intend to spend as much time on the lower priority assets (which are smaller than the piano).

Having completed my UVs, I then watched the Substance Painter Fundamentals tutorials whilst also considering how I wanted to texture my piano. I used the below tutorial to make a burnt wood material in Substance Designer, which I then exported to Substance Painter to use on my model.


Above: screenshots of my progress following the instructions given in the tutorial
After making the material, I then published it as an sbar, ready to be taken into the shelf of my Substance Painter project.

To set up my new Substance Painter project, I added a PBR metallic roughness template and added the FBX of my piano model. As I had used UDIMs when making the UVs for my piano, I ticked the UDIM box. My UVs were made at a 2k resolution so I was able to set this here too.


To add the text onto my piano, I typed ‘font’ into the alpha shelf. Under Parameters I was able to type the text I wanted to appear on my piano.

To export my textures…

After exporting my textures from Substance, I went back into maya and assigned an aiStandardSurface material to my piano. Under the attributes, I was able to add my different maps. I set the weight to 1


After completing my piano, I started to model the piano bench, making a moodboard of different views of piano stools.

After completing my moodboard, I then imported the piano bench blockout into a new Maya file and imported some image planes from my moodboard and scaled them to be the same size as my blockout.

Next, I went into photoshop and using the pen tool, created a path around half of a piano bench leg:

I then exported this path and brought it into Maya. I then used the revolve tool to turn it into a polygon that could be used as a piano stool leg:


I then added a beveled cube on top of the leg and duplicated the leg 4 times. To create the padding on the top of the bench, I found out it was called the ‘chesterfield effect’. I then used the following tutorial to create the effect I wanted for the padding:

After following the tutorial, my next step was to add thickness to these tiles as they are currently flat planes. To do this, I created a cube which I then bevelled to make the edges smooth and deleted the top face. Here, I was able to snap the tiles for the padded area in this space using the V key after altering the pivot point with the D key.
Monday 16th – Sunday 22nd
SCRUM NOTES (16th December)
All members present. Discussed progress and I showed my team images of my completed piano asset to ensure when their models are completed they are in the same style
- Emily – Grand piano asset completed. Close to finishing my model of the piano bench and am on track to have what I set out to achieve last week (piano bench and fireplace) completed by the end of the week. Planning to have completed my room and additions to the hallway by the end of the Christmas holiday.
- Alex – Still need to texture pots and pans in substance.
- Will – Still need to texture table in substance.
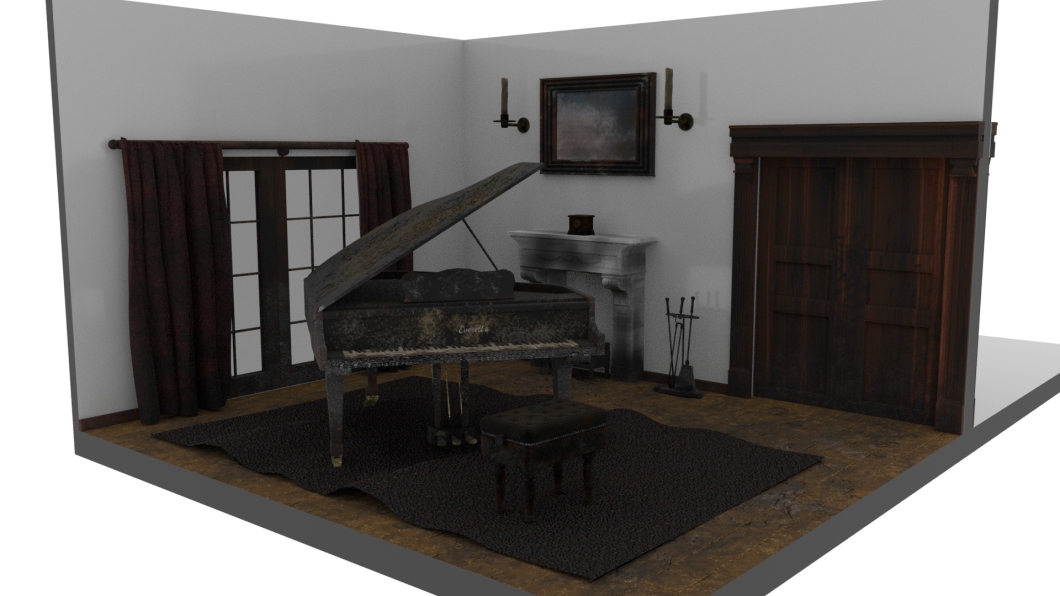
17th December: imported my completed piano and piano bench into the living room:

After completing the piano bench asset, I then made a moodboard with reference images for the fireplace I will be modelling. This highlighted the two main parts of the fireplace I will need to model; the mantle and the grate.

Having made my moodboard, I then proceeded to model the fireplace. This was mainly achieved by using the extrude tool.


When texturing the detail onto the front of the fireplace in Substance painter, I found myself needing to invert a normal stamp. To do this, I added levels to my chosen layer by right clicking. Next, I selected the normal channel, selected the green channel and then inverted it.


- Modelling: 19th – 21st December
- UVing: 22nd – 23rd December
- Texturing: 23rd December
Monday 23rd December – 29th December
Doors to Hall and Dining Room
Before I came to model the doors for my scene, I created a reference moodboard of doors from the 1900s.

When modelling the doors, I imported an image from my moodboard with the style that appealed to me the most for the scene, and ensured I could see the human model for scale reference.
After this, I mainly used the insert edge loop and extrude tool until I eventually had a model I was happy to import into Substance Painter. To save time I had also only modelled one of the doors and used the mirror tool to replicate the second door.
Next, I imported the FBX of the door into Substance Painter. From there I was able to apply a wooden texture. To suit the story behind the room, I added black fingerprints over the door as though someone was trying to escape the fire. I also added the burnt wood material I had created in Substance Designer for the piano to the bottom parts of the doors.


- Decided to make two sets of doors instead of only separating the dining room and living room with a burnt curtain. May still have a curtain on the door if it has windows
- Started doors on 27th December after having a break for Christmas
- 27th – 28th December – modelling first set of doors
28th – 29th December – UVing first set of doors - 29th December – modelled and UVd doors to dining room
- 30th December – textured both sets of doors
30th December 2019 – 5th January 2020
Curtains and Carpet

After making my moodboard, I then used the tutorial I referred to in the blockout stage to make the curtains for my scene.
The main steps to make the curtains involved:
- Creating a polygon plane with multiple subdivisions
- From the FX menu, selecting nCloth > Create nCloth
- Creating a cube, scaling it across the top of the plane and selecting the top row of vertices with the scaled cube. With these selected, go to nConstraint > Point to Surface. This stops the plane from falling when you press play.
- Increasing the number of frames and selecting ‘Interactive Playback’ from the Fields/ Solvers menu. This will enable me to scale the cube on top of the plane and have the plane move like cloth whilst it plays
- Duplicate the finished result and UV.
Having completed the curtains, I moved on to making the carpet for the living room. To make the carpet I used the same process as the curtains.


Framed Paintings


Monday 6th – Sunday 12th January 2020
SCRUM NOTES (6th January)
Our first SCRUM meeting after the Christmas holidays. All members were present and we showed each other our current progress.
- Emily – Living room – completing final mid priority asset, need to texture walls and floor. Two low priority assets and the staircase for the hallway. On track to have all assets completed by the end of the week.
- Alex – Beginning to texture assets
- Will – Beginning to texture assets
Candles


Clock
Moodboard


Floor/ Skirting Board
To create the material for the floor, I followed the following tutorial for Substance Designer whereby I was able to create a material to use in Substance Painter.


ABOVE: screenshots of my progress following the tutorial

Improved Carpet
Having received feedback on my current scene, I decided to create a new texture for the carpet, as I didn’t think the texture of the carpet looked right.
To begin with, I created a base fill layer whereby I applied grey base colour.


Wallpaper
When I came to texturing the walls for my scene, after UVing the walls, I looked at textures other people had created which were similar to what I was aiming to create:

Next, to create the concrete that I wanted behind the wallpaper, I followed another tutorial in Substance Designer to create concrete.
When in Substance Painter, I first created a fill layer and added white noise to it. I then decreased the opacity of the layer to my liking.
Next, I created another fill layer which I filled with a base colour and set the pattern to tile 5 times. I then decreased the opacity of the layer slightly. I added a black mask to both this layer and the noise layer to control where I wanted the wallpaper to be.
I then created a third fill layer, filling it with the concrete material I had previously made in Substance Designer. I then added a black mask and painted where I wanted the concrete to show to make it look as though the walls had damage to them. I used a similar process to paint where I wanted the wooden planks to be behind the walls.
Finally, I used a black dirt brush to add dirt to the scene.


Lighting
To light the living room, I first created a skydome and applied a HDRI. As I will be using this as a secondary light source it only needed a low intensity.
Next, I added a directional light and made it focus on my highest priority asset (the piano). I also adjusted the colour temperature to what I wanted.
As the house is meant to have been abandoned for a while as no one lived there after the fire, this meant I aimed to make it look as though the only light in the scene was coming in naturally. To do this, I scaled a cube around the scene and cut a hole where the window would be in the room. This enabled it to look like the directional light was coming in through a window.
While I was happy with the directional light, this left the candles in the background hard to see. To fix this, I added a spotlight (making sure to add the same colour temperature as I had used for the directional light) and aimed it towards the candles. Again, to make it look as though the light was the sun coming in through the window, I added another, smaller hole to the cube.
In the gaps where the windows are, I added a light portal to help reduce the noise in my scene.
Finally, to hide the cube which is acting as a ‘window’ for the light to come through into my scene from showing up in my renders, I turned off the primary visibility of the cube under the Arnold tab in attributes.


With the hallway completed, all my assets were completed. I showed this on my Trello:

Monday 13th – Sunday 19th January
SCRUM Notes (13th January)
All members present. Discussed progress
- Emily – Completed all assets and added lighting to the living room. Still need to light the hallway and develop blog notes further
- Alex – Still needs to texture some assets and import all models into one scene
- Will – Still needs to texture some assets and import all models into one scene
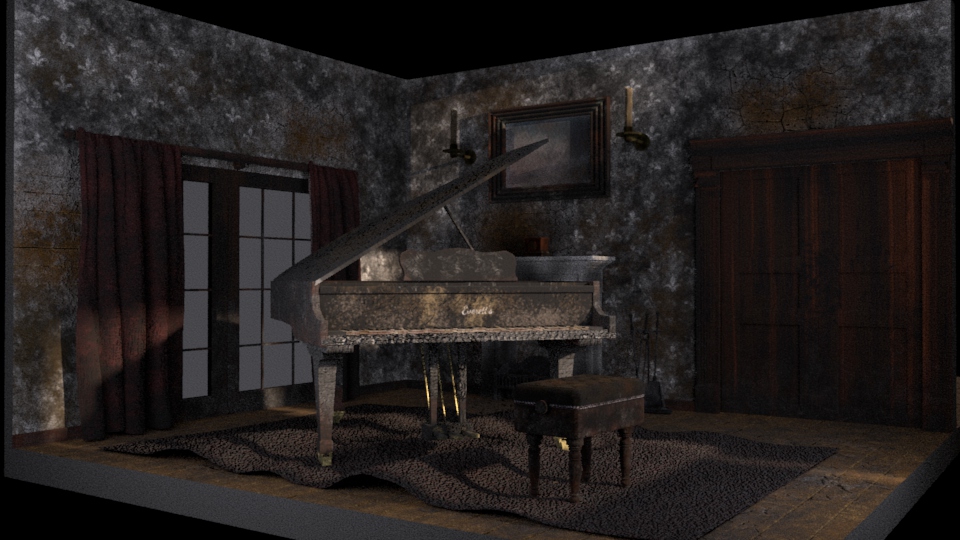
This week I focused on completing my evaluation and rendering the two images of the living room I will hand in.


For my second render, I decided to provide a close-up of my highest priority asset, the piano. Here, you can see the carving in the piano (C+L), which I first added as a reference to Telltale’s ‘The Walking Dead’ game, but then found it relates to the new story behind our haunted house, whereby a piano teacher cheats on his wife with one of his students so the wife locks the teacher and his student in the living room (where he teaches his students) and sets the house on fire.
Animation
In addition to my renders, I also set up a path for the camera to follow for when all the rooms have been combined. To do this, I inserted a circle by going to Create > NURBS Primitives > Circle and then scaled it to surround all four rooms. I then added a camera as well.
With the circle and the camera selected, I went to the rigging menu and selected Constrain > Motion Paths > Attach to Motion Path. This meant that when I pressed play, the camera would follow the path of the circle. By selecting the attributes of the path, I was able to adjust the speed.


Having done this and my evaluation (as shown below), I had finished a week earlier than I had previously planned in my schedule.

Evaluation
Experience of working in a team and success at being a team member
Throughout this project, I believe my organisation made me a good team member, as demonstrated through my continuous updates via the Trello page, clearly displaying my progress to other team members.
I also gave advice to my team during the project, with one example of this being that I suggested using different colours on a table Will was texturing as I believed using brown as opposed to red would fit the realistic style of our combined project, as well as fitting the story more to make it look as though the fire was not recent and as though after the fire, the house had been abandoned.
Working as part of a group has also got me to consider the organisation of the assets within my scenes; for example, as we would be importing all our work into one maya file, I went through my assets deleting the history of objects and ensuring they were named so that if I or one of the members of my group looked in the outliner, it would be easy to find my assets.
Final outcome and production skills
Regarding the final outcomes I produced for this project, I believe focusing on a smaller area as opposed to the scale of the alleyway in the previous project enabled me to focus on the quality of my individual assets.
Additionally, this project was my first time using Substance Designer, which enabled me to make additional materials for my scene.
While the speed at which I modelled and UVd my piano asset could have been improved, this was my highest priority asset so I was prepared to spend extra time on it to make it look as good as possible. For the lower priority assets, I took considerably less time and believe that overall, the speed at which I create assets had improved.
I also believe the wallpaper could be improved further, as I textured the base wall in Substance Painter. Another way in which I could have gone about making the wallpaper was by making actual geometry to make strips hanging off.
For the next project, I plan to start using Sequence Renders as opposed to batch renders, as this will mean I won’t have the Arnold watermark in my animated views of future projects.
Monday 20th – Friday 24th (Final Week)
This week I focused on rendering and editing the turntable for the living room and the hall.
Premiere:

Above is a screenshot of my work in Premiere. I imported my renders as an image sequence and added them to my timeline. Next, I added sound to my timeline. I included fire crackling, and a piano. While the screenshot shows an extra sound, I removed this as I believed it sounded better without it.
These sounds are different to what I had planned to use at the beginning of the project in the proposal as the story behind our house changed during development.

Additionally, I reduced the sound of the fire to be in the background of the piano by right clicking on the sound effect, selecting ‘Audio Gain’, and reducing the sound by -25dB.
Finished Turntable (updated to not have watermark):
